Lighting & Cinema camera Animation Development
This project explores how lighting and camera systems can transform the presentation of a game environment in Unreal Engine. Using a base scene provided by my instructor, I established the final visual atmosphere through the placement of directional, rect, point, and sky lights, supported by fog and post processing adjustments to improve depth and tone. I then created a cinematic walkthrough using some Cine Camera Actors with rails and crane rigs to control motion and framing. The result is a scene study that demonstrates my approach to environmental storytelling, mood construction, and real time cinematic staging.

Overview


This project focuses on environmental lighting and cinematic presentation in Unreal Engine.
I started from a game scene provided by my instructor that did not include any lighting, then developed a complete lighting pass and a short cinematic walkthrough.
My main goal was to build a clear atmosphere, improve scene readability, and present the environment through controlled camera movement using Unreal’s cinematic tools and Blueprint logic.
Visual Research and Moodboard
Before touching the lighting setup, I first looked for a visual theme to guide my decisions. I explored references from historical films and games and found that a historical atmosphere felt the most interesting and coherent for the scene. I then created a moodboard to capture common lighting traits in that style, such as strong directional lighting, layered shadows, cooler ambient tones, and a sense of depth created through haze and contrast. This moodboard became my reference point throughout the lighting process, so my decisions stayed consistent instead of being random adjustments.

Workflow
With the historical moodboard as a target, I built the lighting from the ground up. I used a directional light as the main source to establish the overall light direction and shadow language. I then placed point lights and rect lights to support interior areas and highlight important surfaces without flattening the scene. A sky light helped stabilize the overall exposure and provided softer ambient fill, while fog was used to push the background into depth and strengthen the sense of scale. Finally, I used a Post Process Volume to unify the scene’s look and improve overall tone and readability.
After finishing the lighting pass, I focused on the presentation. I set up some Cine Camera Actors and used Camera Rig Rails and Camera Rig Cranes to create a guided cinematic walkthrough. This allowed me to control framing, pacing, and reveal order, and it helped me present the environment as a composed visual space rather than only a static scene.
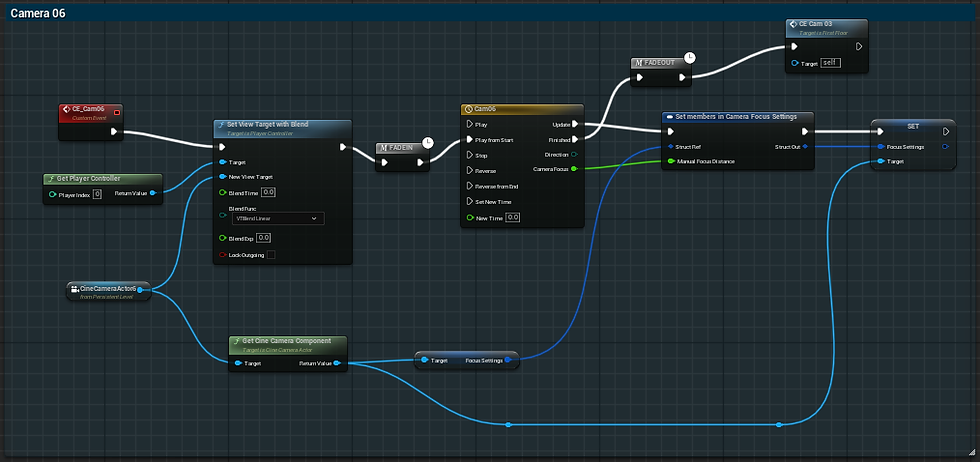
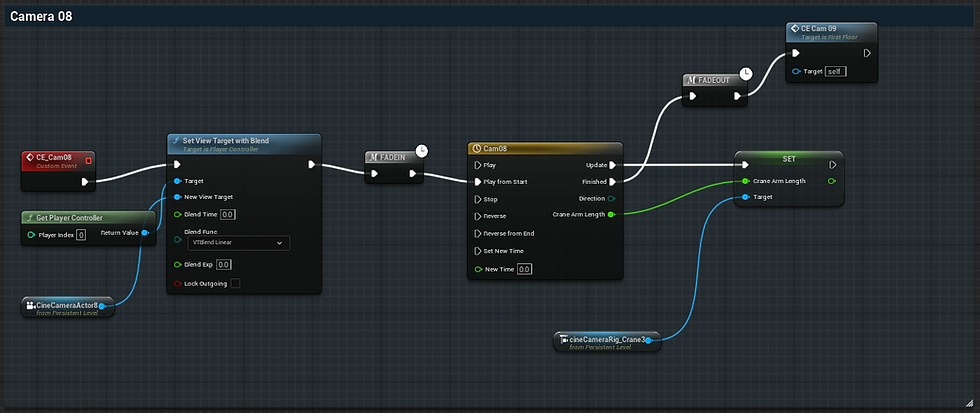
Blueprint Logic for the Cinematic Sequence
The cinematic system is driven through Blueprint logic so the sequence can play automatically. The setup begins at Event Begin Play, where the Blueprint initializes the sequence and triggers the first camera event. Each shot uses Set View Target with Blend to transition smoothly to a selected Cine Camera Actor, then a timeline drives rail or crane movement over time. Structuring the cinematic as a chain of events made the timing easier to control and helped the final video feel like a connected presentation rather than isolated clips.


Additional Blueprint Breakdown
I have additional Blueprint screenshots that document the rest of the camera sequence and show more event variations, timelines, and transitions. These support images show the full structure of the cinematic system without making the main writeup too long.


Outcome
This project helped me build a more intentional workflow for lighting and presentation in Unreal Engine. The historical moodboard kept the lighting choices consistent, while the final cinematic sequence let me present the environment through deliberate framing and camera motion. Overall, the project strengthened both my lighting fundamentals and my ability to stage a scene using cinematic camera tools and Blueprint based sequencing.